how to make a sprite sheet

How to Make a Sprite Sheet

Learn how to make a sprite sheet from image frames. Arrange frames in a grid, set cell size, spacing and padding, preview animation, and export a clean PNG.

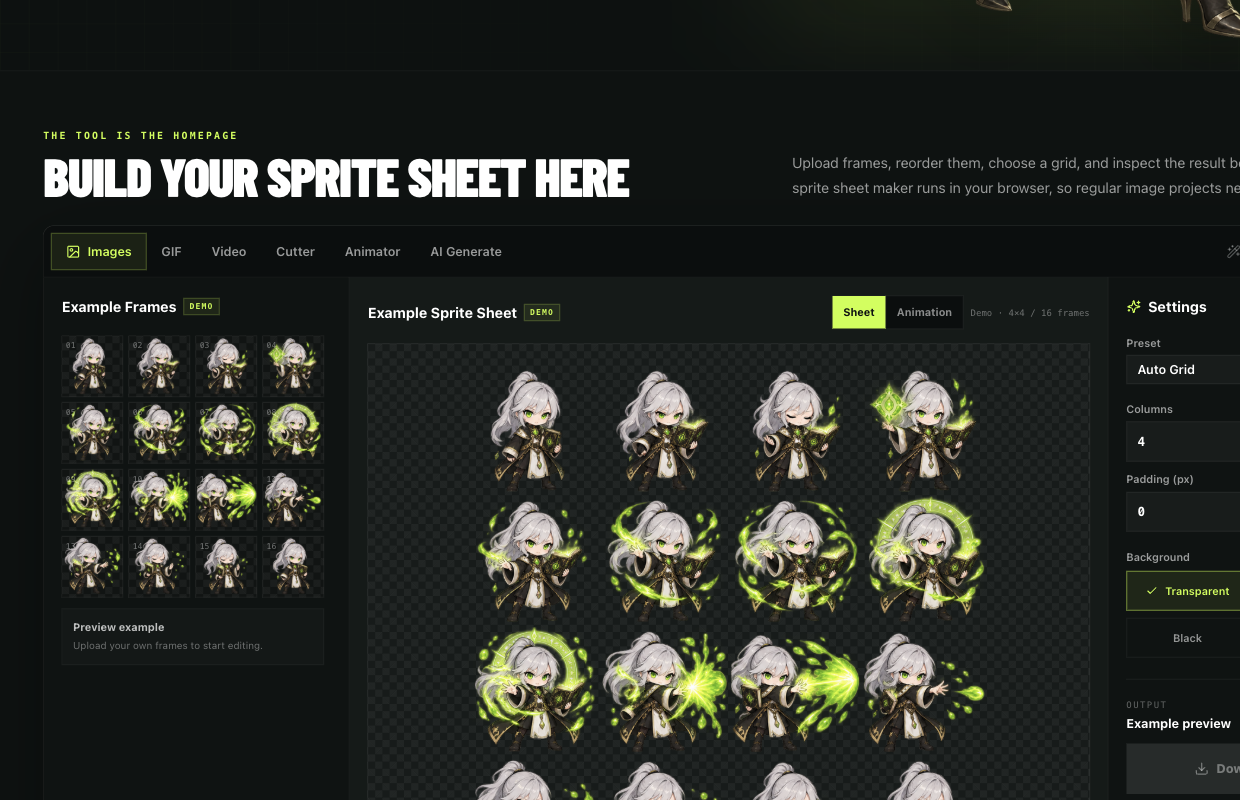
Real Sprite Sheet Maker workspace showing frames, grid settings, preview, and export
Upload
Arrange
Set Grid
Preview
Export

The homepage tool follows the exact workflow in this guide and processes ordinary image frames locally without requiring an account.

Open Sprite Sheet Maker
PRACTICAL NOTES

How to Make a Sprite Sheet: Prepare Frames

The first step in how to make a sprite sheet is preparing the images, not choosing columns. Export one PNG, JPG, or WebP for each chronological pose. Use descriptive numbered filenames such as walk-01.png through walk-08.png. Natural filename order makes the initial import predictable, while the frame list still lets you correct or reverse the sequence.

Keep the camera and character scale consistent. A foot should not grow larger because the pose changed. Preserve enough canvas room for the widest weapon swing, highest jump, longest hair movement, or largest effect. If every frame is tightly cropped to different visible bounds, a tool can pack them but the animation may wobble because the coordinate origins no longer match.

Use transparency for characters and effects that must appear over different backgrounds. Inspect pale outlines over both dark and light surfaces. Remove accidental matte colors before packing. For pixel art, export at native integer dimensions and avoid resampling. For illustrated art, keep the same resolution and color profile across the set.

Decide whether repeated images are intentional timing holds. A fixed-FPS player can make one pose last twice as long by including it twice. Remove accidental duplicates but keep deliberate ones. This is also the moment to decide whether one file contains a single action; walk, attack, and hurt usually belong in separate sheets or documented ranges.

How to Make a Sprite Sheet: Upload and Arrange

Open the maker and upload the prepared images together. The tool reads dimensions locally and lists every frame. Drag to reorder, use keyboard-accessible move controls, duplicate a held pose, delete a mistake, or reverse the complete sequence. Before learning how to make a sprite sheet layout, play the animation preview and confirm that the raw order already tells the intended motion.

Choose Auto Grid for a compact general layout. It uses the square root of the frame count to select columns, then adds enough rows. Choose 4×4 / 16 Frames for the fixed product contract, Horizontal Strip for a simple linear texture, or Custom when the destination specifies a column count. The grid affects storage and import, not the artistic timing.

The cell size should fit the largest frame. Auto uses the maximum width and height across loaded images. Smaller images are bottom-centered so feet stay closer to one baseline. If the destination requires a fixed 64 by 64 or 128 by 128 cell, prepare those canvases before upload or use a fixed-size workflow without scaling the subject independently.

Count the destination cells. A 4×4 layout has sixteen slots. If only fourteen images are loaded, keep two cells empty rather than copying poses silently. If more than sixteen are loaded, switch to Auto Grid or select the intended sixteen. Explicit empty and overflow behavior prevents hidden changes to animation timing.

How to Make a Sprite Sheet: Preview and Export

Padding is the outer margin around the complete texture. Spacing is the gutter between cells. Begin with zero for both. Add spacing when the engine uses linear filtering, mipmaps, or importer rules that need separation. Add padding only when an atlas or platform requires it. Every added pixel increases output dimensions, so calculate rather than adding a decorative border.

Choose Transparent for a normal character PNG. White or Black can help inspect edges and serve destinations without alpha. Custom backgrounds are useful for presentation, but flattening removes flexibility. The checkerboard in the preview indicates transparency and does not become part of the file when Transparent is selected.

Open Animation Preview before export. Play at a likely runtime FPS, pause on key poses, step through first and last frames, and test looping. Watch feet and the center of mass for drift. Check whether a large effect is clipped. If motion jumps, fix frame order or source alignment rather than trying to hide the problem with a faster speed.

Return to the Sheet view and read the output dimensions, frame count, columns, and rows. Download PNG only after those values match the importer. Canvas drawing uses disabled smoothing so frames are not blurred during placement. Keep the original individual images as editable masters and treat the exported sheet as a delivery artifact.

4×4 Example and Common Mistakes

A sixteen-frame 4×4 example is a useful rehearsal. With 256-pixel cells, the sheet is 1024 by 1024 at zero spacing and padding. Two pixels between cells add six pixels across each dimension. Eight pixels of outer padding add sixteen more, producing 1046 by 1046. The size guide explains why this result is not a power of two and when that matters.

The most common mistake is inconsistent source alignment. The second is confusing internal transparent room with grid spacing. Internal room belongs to every cell and protects the action. Spacing sits between cells and is discarded when cutting. A third mistake is choosing rows and columns from appearance without checking the frame count and importer.

Another mistake is exporting before playback. A still grid can look tidy even when frames 7 and 8 are swapped. The animator makes temporal errors visible. A final mistake is enlarging pixel art with smoothing or reducing detailed art until thin features disappear. Keep native frames, use integer scaling when appropriate, and test in the target engine.

Once you understand how to make a sprite sheet from image frames, the conversion tools become easier to reason about. GIF and video pages create the same frame model before packing. The cutter performs the reverse geometry. The animator reads the same cells. Shared concepts—order, cell size, baseline, padding, spacing, and timing—connect the entire workflow.

Questions,
answered.

How do I make a sprite sheet from PNG images?

How to make a sprite sheet from PNG images: prepare chronological frames, upload them, correct order, choose a grid, set spacing, preview, verify size, and download one PNG.

How to make a sprite sheet from differently sized frames?

How to make a sprite sheet with different sizes: let the maker use the maximum cell, but preserve consistent canvases and origins whenever possible.

How to make a sprite sheet with the right columns?

How to make a sprite sheet layout depends on the importer. Otherwise Auto Grid is compact, 4×4 suits sixteen frames, and a strip suits short sequences.

How to make a sprite sheet with correct spacing?

Start at zero. Add a small gutter only for filtering, mipmaps, texture bleeding protection, or destination rules. Spacing is not required decoration.

How to make a sprite sheet with transparency?

Transparent PNG is standard for characters and effects. Use an opaque background only when the destination truly does not support alpha or the asset is designed for one surface.

How to make a sprite sheet without animation jumps?

Check source canvas origins, baseline, cell dimensions, grid spacing, frame order, and tight per-frame trimming. Step through frames slowly to isolate the first shift.

How to make a sprite sheet in a 4×4 layout?

Choose the dedicated 4×4 / 16 Frames preset. It fixes four columns, four rows, and row-major order without copying missing frames.

How to make a sprite sheet without uploading frames?

The ordinary maker reads files, builds canvases, previews motion, and exports PNG locally in the browser. AI generation is a separate remote workflow.